HSE system uses visual icons to help employees identify potential hazards, correct behaviors
By Wayne P. LeBlanc, W C Safety Systems
Many companies use one system for hazard identification, one system for a job safety analysis/job hazard analysis (JSA/JHA) and still another system for behavioral observations. Not only is this cumbersome and potentially confusing, but employees have difficulty becoming truly proficient in two or three disciplines simultaneously. It is far more beneficial to teach employees one system to be used throughout.
Language difficulties inherent to a multinational work force make the job of providing a safe workplace even more difficult. Words and concepts are often mistranslated and robbed of their effectiveness.
Years ago, on a deepwater rig drilling for BP in the Gulf of Mexico, the drilling contractor had a trained work force, good safety systems in place, and in general had a good overall safety attitude among employees.

However, the crew began having numerous near-misses. Upon review it was discovered that their JSAs were deficient in recognizing all hazards associated with the task. While some hazards and control measures were noted, many hazards associated with routine tasks were being overlooked. Employees simply did not recognize those everyday hazards, and no action was taken.
Since the majority of incidents typically occur while employees are performing routine tasks, BP asked W C Safety Systems to devise a system that would enable employees to search for hazards in any task – a guide, if you will. The system would have to be easy to use and understand, integrate into a company’s existing JSA forms, processes, etc, address language difficulties, and be portable.
Potential accidents
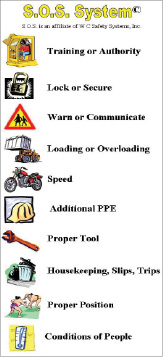
There are only 10 causes or contributing causes for most incidents, called “situations of potential accidents.” If we search for and control the hazards associated with each of these causes, we should reduce or eliminate incidents. A picture or icon has been assigned to each (Figure 1):
1. Operating without proper training or authority: doing a job we are not trained to do; doing someone else’s job; doing a job we don’t fully understand.
2. Failure to lock or secure: not using proper lockout/tag-out procedures; failure to secure a load; failure to use barrier tape or guards.
3. Failure to warn or communicate: not posting warning signs; failure to remove unnecessary warning signs; incorrect hand signals; malfunctioning radio or telephone equipment.
4. Unsafe loading or overloading: overloading a lifting device or slings; overloading power tools; overloading electrical circuits; overloading our bodies; overloading our minds.
5. Unsafe speed: running rather than walking; working too fast; driving too fast or too fast for the conditions.
6. Additional PPE: not wearing basic PPE; not wearing additional PPE required for the job, such as fall protection, breathing mask, chemical gloves, etc.
7. Using an improper or damaged tool: using a damaged tool; using the wrong tool for the job; using modified tool, such as “cheater pipe”; using tools without guards.
8. Poor housekeeping: slips, trips, fall hazards; spills; blocked passageways; no escape route.
9. Improper positioning: lifting in an improper position; standing in the line of fire; pinch points; between a moving and a fixed object; under a load.
10. Conditions of people: mental condition; distracted employee; mental or physical fatigue; unsteady employee.
By assigning an icon to each of the 10 “situations,” the system becomes easy to understand and easy to learn. Language barriers no longer exist.
Each icon or picture represents a category of hazards to look for. Regardless of the type of work the employee is performing, by using categories to search for hazards, the system will always be effective. Ideas conveyed through pictures are far more effective than using words or phrases alone.
THE JSA
When completing JSAs, most employees use what we refer to as a random approach to finding hazards. The hazards recognized are those which we think of at that point in time. Employees sometimes use a pre-configured JSA, as if nothing ever changes from location to location.
By using the “situations of potential accidents” as a guide, similar to the manner in which a pilot uses a pre-flight checklist, hazards are not overlooked. A pilot knows what to check, the checklist is simply a reminder or guide so he does not overlook an item to be checked.

Once a step to the job is identified, the employee starts with number one, the crane operator (Figure 1), and asks if any hazards are present from training or authority. If so, he determines the method to control or eliminate the hazard. Number two, the padlock, directs him to look for hazards associated with lock or secure. Again, if a hazard exists, he determines how to control or eliminate it. The employee continues this process through all 10 pictures.
Of course, a JSA is still only as good as the person preparing it. But even an employee with a limited understanding of how to prepare a quality JSA would still find more hazards using a systematic method then he would without it.
This simple process works equally well when a JSA is not required. In this case, the employees would conduct a pre-job or tailgate or toolbox safety meeting. Using the “situations of potential accidents” as a guide, employees discuss the job and recognize hazards by again following the 10 icons.
Behavioral observation
Since we recognized hazards and planned our job using the “situations of potential accidents,” it makes sense to observe based on how we planned. The “situations of potential accidents” provides a template to ensure that employees behave as they agreed to behave during the JSA or pre-job meeting.
Observe our surroundings
When we walk through a location, we will usually find hazards. But are we finding all of the hazards? To become a more effective observer requires training and repetition. Using the “situations of potential accidents,” we begin to view our workplace differently. We become more focused on what could happen, and that makes us better observers.
Imagine that you heard a story of someone backing their automobile from their driveway and running over a child. You formed a mental picture of that incident. For a period of time, you remembered to look for a child before backing. But as time progressed, you became less and less aware of looking before backing until the thought was probably not there. If you were able to place your mental picture of the incident inside your vehicle, you would be reminded to look before backing.
The icons work the same way. In discussions prior to the job, the employees see the icon and relate a hazard or hazards to it. As employees are working, they remember the icon and are reminded of the hazards they discussed earlier.
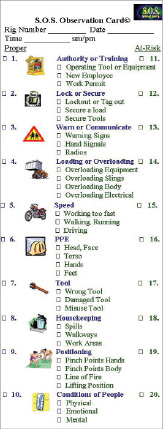
The observation card provides a guide to assist us with our observations (Figure 2).
Recordation

Completion of the observation card should not be the ultimate goal of a behavioral observation process. Making the observation and removing an employee from danger or congratulating an employee is the primary focus. Recordation is simply a record of the activity we have performed.
The observation card not only contains the same “situations of potential accidents” but also contains sub-areas. For example, if someone was attempting to lift a heavy object alone, after removing them from danger, you would check block #14 at-risk “unsafe loading or overloading,” then check the sub-area “overloading body.”
Tracking and trending
Completed observation cards contain valuable information. Due to staffing constraints, some companies are unable to make effective use of this data. At times they may only be able to count how many cards are turned in as a measure of the program’s success.
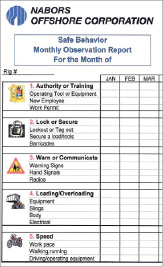
A monthly report shows the number of proper and the number of at-risk observations that were made and the number of observations made for each sub-area. Figure 3 shows a partial monthly report for Nabors Offshore Corp.
By looking at the data over a period of months, trends often appear that allow us to take action prior to having an incident. For example, if a significant number of observations are recorded for “improper positioning” (number 19) with a sub-area of “pinch point hands,” this is a signal to commence a hand safety awareness program. Conversely, if a significant number of observations are made for “proper housekeeping” (number eight) with a sub-area of “walkways,” this is a sign to launch a recognition program for the efforts being made to maintain clean and clear walkways.
Tracking observations can also provide proof that a corrective action is indeed being implemented by employees.
If hand injuries begin to occur, you will probably launch an initiative to increase focus on hand safety. You should then see a spike in the number of observations for proper (number 9) or at-risk (number 19) “positioning” with a sub-area of “pinch points hands.” This provides proof that the employees are giving more attention to hand safety.
SUMMARY
Now may be the best time to consider upgrades to your current HSE systems. The employees that are still working are probably our better employees. Their attitudes toward change and upgrades are better as well, and it is preferable to get these people onboard and trained prior to adding new employees during the next uptick.
Creating a task-based system that is easy to learn, easy to understand and easy to participate in will ensure success with our existing employees and make it easier for our new-hires to get up to speed.
Whether using the S.O.S. System or an alternate system, combining the various elements into one continuous thought process helps us protect our most valued asset – our people.
This article is based on a presentation at the 2010 IADC Health, Safety, Environment & Training Conference & Exhibition, 26-27 January 2010, Houston, Texas. Wayne P. LeBlanc is president and CEO of W C Safety Systems.


Very impressive system. Can I have more detailed presentation or a paper on the subject so that we can adapt to our application in our company.
Thanks